Wednesday 23 March 2011

Something a little different

Hi everyone,

Well, this post is a little different to my usual, because (drumroll, please)... I made something other than a card! (So I apologise for this one being extremely photo-heavy...)

I'd like to introduce to you my first little pocket-mini-album!


(Isn't it pretty?!)
Well, the story behind this little book is that I was browsing the web and came across a video tutorial (here) which helped you make a mini-album with cute little pockets in which to store all your stuff!
So I realise now that in the States, mini-albums and scrapbooks are pretty common, but here in the UK they are a well-kept secret! I guess I understand why they are soooooooo expensive when you do come by them in those cute little village gift-shops by the sea... they are pretty rare!

So I was chuffed to bits to find out that I could make something so cute myself, with what I have to hand!

I made this album with a couple of friends in mind; it was their 2-year anniversary at the end of last year, and I decided to make them something unique.
I haven't been able to post it until now, though, because I hadn't got round to giving it to them until this weekend (...oops!)!!! But it's the thought that counts, right?

Okay, so about the book...

1. I kept the front cover blank, so that they can personalise it however they like. I toyed with creating a front cover myself for the LONGEST time, but then decided that they probably have their own favourite photo to add, and this may turn into a holiday album or something; I didn't want to force it into anything. Hence the simple kraft front cover. (And of course, I added ribbon, because... well, you know... I had to!).


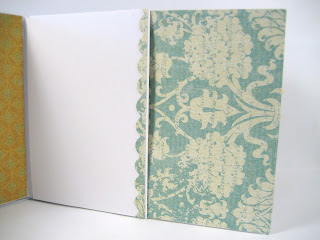
2. Okay, so this is the inside cover, and is a little different to the rest of the pages, as you'll soon see, because it doesn't have an envelope-flap. So this would be a great pocket for large photos, or items that aren't likely to slide out easily.
I left it blank so that it can be used as a photo-mat, or even the base of a collage.
3. Page three also includes a pocket, as well as a place for notes, photos, cinema-stubbs... anything, really!


(Excuse my fingers!)

 4. The next page is pretty much the same as the inside cover, except for just one difference: it has a flap over the top, which makes the pocket great for storing smaller items in. Notice that the flap is made from the end of the paper used on the previous page. I love the contrast!


5. I slipped a journalling-tag into the pocket on the next page, along with a gorgous little frame (cut using my Silhouette machine).


6. The next page is another pocket and photo-mat


And this photo is just to show that the flap on each pocket has a different under-side, for more contrast. I love all these stunning papers!

7. Another pocket with a journalling-tag added (and this one has a ribbon-tab)


8. Another photo-mat and pocket


9. A pocket with journalling-tag


10. Pocket and photo-mat


11. Pocket and journalling-tag


12. Pocket and photo-mat


13. This is the inside back-cover, so again, it has no flap, but still has a pocket and space for journalling on the side


14. And finally, here is the back cover:


Phew! Sorry for such a long post; I just wanted to show you every page because this paper is so pretty (details below).

And finally, here it is, all wrapped up:


I used blue/teal tissue paper to wrap it, and then slipped the album into a plastic box which originally had a set of stamps in it, from Papertrey Ink.
I took off the label that came with it, and replaced it with some patterned paper. Then I stamped the label and sentiment, cut it out, and stuck it down on top (it's a little off-centre, I know!).

Ooh, can't wait to give it to them! I hope they like it!!!

Well! That's it from me - again, I apologise for such a long post, but I had such a feeling of accomplishment after making that album, and just had to share :) 

Take care and I'll be back soon with another card.

Tasha :)

SUPPLIES (used to decorate):
Mini-album
Paper: Ancestry photomats, K&Co; Linen cardstock, Papermill Direct; Kraft cardstock, from my stash; Cream cardstock, from my stash
Ribbon: eBay

Gift-box
Paper: K&Co mega stack; 200gsm white cardstock, Rymans Stationers
Stamps: Matstack 4 and Mega Mixed Messages, both Papertrey Ink
Ink: Memento black ink; Blue ink from my stash.
Misc: Scissors; ATG gun

Sunday 20 March 2011

Love Birds

Hi everyone,

So here's another card; I made it over the weekend for our friends whose anniversary it was this week.

I made it using the 'Love Birds' stamp set from Papertrey Ink; so cute! I love this company!


Sorry there are a few more shadows than usual; the card came up so bright that it was difficult to show the extra detail (the pearls and ribbon).

And a close-up of the sentiment:


So this one is mainly stamping; I wanted to keep it nice and simple, with just a splash of colour - I think it gives it a classic touch, which I love for these special cards!

Hope you like it!

Catch you next time.

Tasha :)


SUPPLIES:
Stamps: Papertrey Ink, Lovebirds / Mega Mixed Messages
Ink: Memento black; Versacolour ink, Rose red / Sea green
Cardstock: Linen cardstock, Papermill Store
Misc: White ribbon (1/4 inch), Hobbycraft; Adhesive pearl gems, eBay

Friday 18 March 2011

A little note...

Hi everyone,

I'm just adding a little note to say that over the next few weeks, you'll be seeing some changes and updates to my site. I'm giving it a makeover, but am doing it myself so it's pretty much trial and error as to how I go! And I'm quite the perfectionist, so it'll probably be a while before I have it *perfect*!

Okay well that's it from me; hopefully will be back with another post very soon!

Take care,

Tasha :)

Pretty Colours

Hey guys,

Here's another card that uses the 'Floating Blossoms' stamp by Hero Arts. I LOVE the colours in this card! I used Kath Kidston as inspiration; her colours are sooooooooooooo pretty!

Here's the card:


Cute!

Anyway, this is a VERY short post as it's late and I need to get some sleep!!!

Thanks for stopping by!

Tasha :)

Tuesday 15 March 2011

Hello again :)

I'm back with another card I made, and once again it's very clean and simple!

I just looooooooove this lace background stamp from Hero Arts; isn't it beautiful?!!! I've had it for a while, but can't bear to do anything with it but focus on the stamp itself; the detail is just so intricate.

So here is the card I've made:


And a close-up of the sentiment strip:


I stamped the image onto some white cardstock, and then distressed the entire piece. Then I stamped my sentiment onto a strip on vellum, and scored the top and bottom edges (1/4 inch in) before wrapping it around and adhering it to the back of the distressed piece. Then I mounted the piece onto a white card blank, and added some pearls as the finishing touch.

What do you think? I love the 'understatedness' of the whole thing, and the subtlety of the lace; gorgeous!

Anyway, I hope this has inspired you in some small way!

Until next time, then!

Tasha :)

SUPPLIES:
Stamps: Hero Arts Lace Background; 'Big Sentiments' by Paula Pascual
Ink: Black Memento Ink; Distress Ink in Stormy Sky and Broken China
Cardstock: Vellum (eBay); Linen Cardstock, Papermill Direct; 200gsm A4 coated card, Ryman's
Misc: Adhesive pearls, 3mm (eBay)

Sunday 13 March 2011

The Minimalist In Me

Hi everyone...

It's been a couple of weeks... sorry... (!)

I've been busy working on some things, and also taking some time to get into a new project: jewellery!
One day I decided that I'd like to try making my own buttons and see how they turned out, which then got me thinking about jewellery and pretty rings, pendants, and even cufflinks for the hubby!

I've been quite excited about it all, and had a play with some clay today. I'll be getting most of my resources next week and I'll also have some time, so look out for my creations in the not-too-distant future! (Eeek, so exciting!)

Okay, so back to my cards; here is one that I made after being totally inspired by Dawn McVey's wonderful use of paper doilies! Have a look at her site; you'll see them pop up quite quickly - she uses them a lot! I love them, and the way she uses them, having them peeping out from behind things, or being part of the main accent.

Anyway, enough babbling; here it is:


And a close-up of the distressed-edge detail:


(I think you can see how simple this card was to make!)
I took a paper doily and cut part of it off. Then I distressed the outer edge. I stamped the sentiment on some linen cardstock, cut it out and rounded the corners, and then distressed the edges in the same colour.
I used a paper-punch for the butterfly, distressed those edges too, and then stuck everything down using a combination of ATG tape and glue-dots.

It's VERY clean and simple, but I think it looks quite sweet, and would work well as part of a set. Gives me an idea :)

Thanks for stopping!

Tasha :)

SUPPLIES:
Stamps: Paula Pascal 'Big Sentiments'
Ink: Broken China distress ink by Tim Holtz
Cardstock: Linen cardstock from Papermill Direct (UK)
Misc: Royal Butterfly punch by Martha Stewart; Doilies are from my stash